Using Colab for training Deep Learning Models
Google Colaboratory or simply “colab” is a Jupyter-Esque environment which provides a platform for writing and executing python code in a browser. Colab notebook environment runs on cloud and the ipython notebooks are stored in google drive. The availability of free GPU’s and easy sharing is what really distinguishes any of its contemporaries.
Starting with Google Colab
Tip 1 : Connecting with Drive
Mount the drive to the collaboratory.
from google.colab import drive
drive.mount('/content/drive')
This step lets the user read the files present in the mounted google drive and subsequently write result files to the drive. After mounting, the drive home page can be treated as the root folder. For example, to read file “news.txt” present in “News_Files” folder in the drive the following code can be used.
with open("/content/drive/My Drive/News_Files/news.txt", "rb") as infile:
  outfile.write(infile.read())
Tip 2 : Using free GPU
Colab allots one of NVIDIA K80, P100, P4, T4, and V100 GPUs to the user on a random basis. These GPUs are quite costly if brought separately.
- NVIDIA K80 - ~5k USD
- NVIDIA P100 - ~6-9k USD
- NVIDIA P4 - ~2.5k USD
- NVIDIA T4 - ~2k USD
- NVIDIA V100 - ~8k USD
To start using the free GPU:
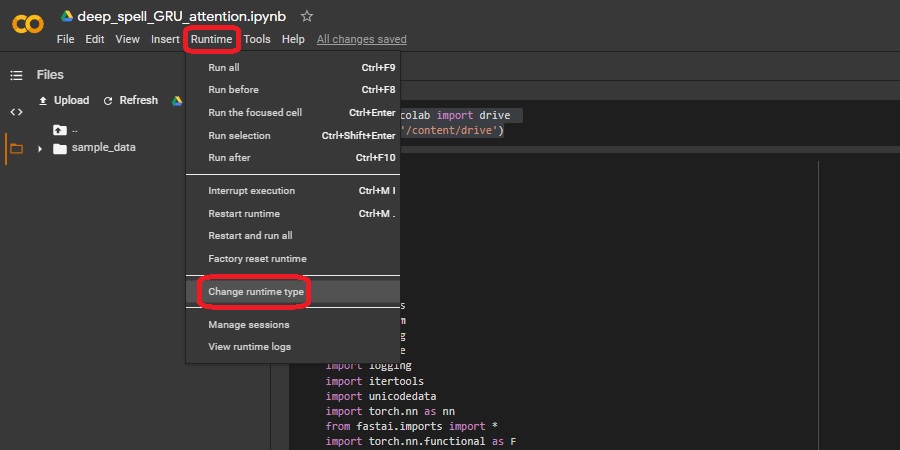
Menu bar –> Runtime –> Change Runtime Type –> GPU

To check the model of the GPU alotted, use command
!nvidia-smi
It is important to keep in mind that Google provides limited use of free GPU service. So, use this option only when training and testing the models, not while writing code.
Pro Tip - Some of the models I’ve trained took significantly longer than than the upper limit of the capacity. I tend to save the checkpoints in the drive regularly (in PyTorch using ‘torch.save’) after a particular number of iterations. After the capacity of the google account I’m using gets drained, I download the ipython notebook and reupload it to another colab account in incognito. Finally, mount it on the original drive account in which the saved model was stored and load the saved checkpoint file. This will resume the training process from the checkpoint. All in all, you can use the GPU provided by colab forever given you have access to a sufficient number of google accounts.
Tip 3 : Installing libraries/modules in colab
All major libraries/modules like PyTorch, TensorFlow, Fastai, OpenCV etc. are preinstalled in pytorch. If you wish to use a custom library which is not already there in colab or to use a different version of the preinstalled module, you can use !pip install or !apt-get install.
 !pip install -q matplotlib-venn
 !pip install tensorflow==1.12.0     #Downgrades the tensorflow version.
”!” prompts the notebook cell to treat the code as a command line script.
Tip 4 : Increasing the maximum available RAM in colab
Colab provides 12.5 GB RAM by default. At times the size of the dataset is too big to be accommodated in that amount of RAM. If the amount of RAM to be utilized is less than that is available, the session crashes. To increase the amount of available RAM, the user needs to just crash the session once. This automatically results in the allocation of 25.51 GB RAM. Running the following code in colab should result in the crashing of the session.
d=[]
while(1):
  d.append('1')
The user can’t go beyond the 25.51 GB RAM limit in a session, so there are a few tricks that can help in limiting RAM usage.
- Reduce the batch size.
- Choose memory-efficient options while processing and storing data. eg. Using tuples instead of lists to store data.
- Delete temporary variables.
- Divide the data to be trained upon into multiple files and upload just a single file at a time.

Tip 5 : Sharing ipynb files via colab.
Colab provides easy sharing of files to others via email or via a sharable link, It even provides the functionality of pushing files to a Github repository in just 1-2 clicks. These options can come handy while working in a group project as the owner can manage who can view and edit the files.